Showing posts with label cooking. Show all posts

Apr 5, 2016

Something Tasty {Cauliflower Rice}

So cauliflower is NOT my favorite veggie. But I can handle it "riced" and not get angry. It's ok mashed but still not my favorite. If I do make mashed cauliflower then I have to stir in just a little bit of real mashed potatoes...just to make it right. I mean if I am being REALLY strict like I was when I was eating Paleo then I would add several steps like squeezing the mashed cali through cheesecloth to get rid of all of the moisture to make it more potato-y like. So laborious!

Now that you can find cauliflower already cut up, making rice with it is just...easy.

Here's how I do it:


I used light butter this go around. Sometimes I use coconut oil. Sometimes I just spray the pan with a little bit of cooking spray. I add a little bit of garlic, salt, pepper and parsley.


Cauliflower Crumbles are AWESOME! I hate chopping cauliflower! It flies everywhere!


I let it get a good sizzle in the pan. After about 5 or 6 minutes I turn off the heat. I like it to still have a little bit of a bite to it. Don't cook it to long or it will be mushy.


That's it! I put it under chicken and gravy for a low carb dinner!

Jan 26, 2016

Something Tasty {2 Cheap & Easy Dinner Ideas}


I'm all for finding recipes that use 5 ingredients or less, that are easy on the pocketbook and are easy to throw together. Plus, these two recipes happen to come in under 300 calories per serving!

 Two super easy and super cheap meals that really work for me and my family. Oh and they're tasty too! I wanted to share them with you and pass on the love!


Have you ever made split pea soup? It is about the easiest and cheapest meal I have on my roster. A 16 ounce bag of dried peas is less than a dollar, the chicken stock is around three dollars, and if you want to use a ham bone, those are around two dollars or less! I get at least 6 servings out of one crockpot. That's about $1 a serving. It will feed us all for dinner and then leftovers for lunch the next day. The ham bone gives it almost like a smokey flavor but you could leave that out if you wanted to. You could use veggie stock instead and keep it meat free.


So here's the basics for Split Pea and Ham Bone Soup:

Ingredients:
16 oz bag dried peas
4 cups chicken broth
ham bone (optional)
garlic powder, onion powder, s&p (optional)
***approx 250 calories per serving***

1. Sort through your peas and make sure to toss out any hard ones


2. Add chicken stock and ham bone to the peas in the crockpot. I also like to add some garlic and onion powder, salt and pepper.


Cook for about 6 - 8 hours. I remove the ham bone first, get the meat off and then add it back to soup. You can use an immersion blender to blend together but I just stir it and it comes together!

At this point it is not so pretty as the bright green peas it started out as but it's tastier!


I like to serve it with a grilled cheese sammie or a side salad.
 Each serving is about 250 calories so you will feel good about indulging in this creamy soup! If you're thinking....ewwwwww peas! Green soup are you kidding me? Just try it...I know you'll love it.


The second easy meal is a recipe I found on Pinterest a few years back and have just kept in my brain for those days that I want to have what smells and tastes like a Sunday dinner but can be made in 20 minutes on a busy Monday night!


Here are the basics on Roast Beef and Potato Rolls:

Ingredients:
6 - 8 oz Sliced Roast Beef
2 -3 cups mashed potatoes
brown gravy (make your own or buy pre-made) to make your own bring beef stock to a boil and add cornstarch to thicken. Season with salt, pepper, garlic powder and onion powder
 4 oz shredded cheese (optional)
***approx 214 calories per serving***

Start with good quality sliced roast beef. You could cook your own, buy it from your butcher, whatever your heart desires. I kept this one on budget and used Oscar Mayer Natural Roast Beef (no added yucky stuff). I like the beautiful red color - it wasn't nasty brown!


Go ahead and have your mashed potatoes ready to go. Make your own or use instant. Whatever works for you. I won't judge you! There is no need to salt them or add butter or anything.

You're making a little roast beef and tater burrito!


Add your roast beef and potato rolls to a 9 x 13 pan that you sprayed with cooking spray. Line them all up cute and snuggly like.


When you're done with lining up your rolls, pour your beef gravy over the top. I like making my own because I can control the ingredients/sodium/etc. You could omit the gravy all together if you wanted to,


Should look a little something like this. You can stop at this point and put them in the oven now. Or you can add some cheese to the top.


This is about 4 ounces of low fat cheddar.


Pop in a 350 degree oven for about 20 - 25 minutes.

I cut it into 6 squares. Each square is about 214 calories.


I serve this with a nice big pile of green beans and a salad! I like how the protein, dairy and veggie are all contained into one roll! You might be saying...potatoes?! They're not good for me. But hey - even white potatoes have been added to Whole30. They're not as bad as you think they are! It's what you do with the potato that makes it worse for you...deep frying, etc.

Thanks for letting me share! Let me know if you try either one!

Mar 24, 2015

Something Tasty {Paleo Muffins}

As of right now I am still eating a Paleo diet. I have been adding a safe starch maybe once or twice a week to pick up more carbs because I feel so fatigued all the time. So I guess it could be argued that I'm not eating Paleo! Oh well. Until I can get tested for adrenal fatigue or get further testing on hormone imbalances I have decided I might just be the kind of person that needs a little bit more than just 10% (or lower) of carbs a day.

 I found this recipe on Fed & Fit for Paleo Scones. They are made with cashew meal and taste SO much better than an almond meal scone (I think). When I made these scones the first time I loved the texture but I wasn't fond of tasting the coconut oil in the final product. I let them sit in the fridge for a day or so and the flavor mellowed out a bit. The second time I made them I used olive oil instead of coconut oil. Personally, that really made them great right out of the oven. But hey, if you like the taste of cooking with coconut oil then more power to ya! 

So for the THIRD time I made these puppies I thought....why not try mini muffins? YES! This is the final result that is finally...my favorite. 


The changes that I made were I used blackberries and raspberries instead of blueberries and swapped out olive oil for the coconut oil. I did reduce the time in the oven by 5 minutes for the mini muffins. 


These are so delicious. You do not need to grind the cashews yourself if you live near a Trader Joes. They have Cashew Meal in a bag. Easy!


I have used just blueberries before and they have tasted wonderful. I have used frozen and fresh and the only difference that I can find is that the frozen fruit will change the batter color slightly because of the juice. 


Even if you're not on a Paleo diet these little guys are a great way to get your healthy fats in through your cooking oils! 

Aug 18, 2014

Something Tasty {Paleo Banana Breakfast Cookies}


 I think I have mentioned here and there on facebook or instagram that I am trying to transition to the "Paleo Diet". Some people call it "Primal Diet" or "Caveman Diet". This whole thing got started when my husband was reading about The Whole 30 Challenge and Wheat Belly. Of course Whole30 has been making waves in the nutrition world for quite a while now. I had heard about it and seen it all over the internet but I was never interested. I was like - no way will I ever do the Whole 30 Challenge. It's too restrictive! I can't even have chocolate! WHAT? I'm still not really interested in the challenge. Maybe one day. But it was the Wheat Belly info that really got me thinking. I had been complaining for the last 6 months or so of always feeling so bloated all the time. I could pass for 3 months pregnant at any moment. It was just how I always looked. My belly always looked like I had just finished a big buffet lunch. Even if I had just had something very small.  I read this statement from the author of the book, William Davis:

"Over 200 million Americans consume food products made of wheat every day. As a result, over 100 million experience some form of adverse health effect, ranging from minor rashes to high blood sugar to unattractive stomach bulges preventative cardiologist William Davis calls "wheat bellies." According to Davis, that excess fat has nothing to do with gluttony, sloth, or too much butter: it’s due to the whole grain wraps we eat for lunch."

I do not have any health concerns but I was really intrigued with the idea that my belly was bulging because of what I was eating, not necessarily the amount of calories. I had heard about the Paleo Diet as well and the hubs and I thought it was time to give it a try. He had been doing Atkins for the second time in his life but was not having much success this second go around. I never did Atkins and never will. Yet again, like with the Whole30, it's just too restrictive for me. But I may give Whole30 a try....someday.

ANYHOO that brings me to this recipe! Eating a Paleo diet has been challenging. Why? Because there are no processed foods. I can't grab a bowl of granola for breakfast. I can't eat a cup of yogurt. You have to plan ahead. You have to cook. You have to combine, mix, bake and freeze things for later use. Think of yourself as a Pioneer lady...just without the cow you have to milk, the lard you have to render or the 9 million other things they had to do along with making EVERYTHING from scratch. I try to remind myself that even though I am spending a TON more time in the kitchen I still have lots of luxuries that make things go quicker. Kitchen gadgets are now important to me. My freezer and fridge space is important now. The cabinet that used to hold boxes of crackers, rice cakes and sugary 100 calorie snacks...not so much. 

These breakfast cookies are wonderful. They taste more like a muffin than a cookie. They do not have a cookie crunch or texture. I guess you could call them more of a muffin top. I had some fruit on the side and that really brought out the flavors in the "cookie". The recipe does call for baking soda which is technically not good to go for Paleo. I have some arrowroot powder that is a good substitution for baking powder. The more I transition the better I will be at using those substitutions. I think I will be able to do it next time I make these.


I took the recipe directly from here.  For my mix-in's I used organic shredded coconut. I am NOT a coconut fan really. But I am getting used to it. Plus the organic shredded coconut I get is really finely shredded and  doesn't have that much coconut flavor. I think the coconut I grew up hating was never really truly fresh, raw, coconut. It was the nasty artifical flavored stuff that was way to overpowering and looked like paper shreds. 


Even if you're not doing Paleo, these are healthy, easy to make and easy save in the fridge for fast snacking. I love that there is no added sugar. Just the natural sweetness from the banana.


Jul 13, 2014

Something Tasty {Homemade Granola}


Granola. Something that has been around for years but I never made any myself. It's so easy to make and I'm wondering why I never made it until now. I like this better than the store bought kind because it is less sugary and it's not super break-your-teeth crunchy.

I used this recipe and changed just a few things. Not much.

Here is her ingredient list with the changes I made noted on the side. I underlined which one I used when she gave a choice.

2 cups raw, whole rolled oats (aka old fashion oats) 
½ cup raw nuts, chopped (I used sliced almonds)
¼ cup raw seeds (sunflower or pumpkin seeds are great) 
½ cup unsweetened dried fruit, chopped (optional) (I used cranberries and waited until it was out of the oven to mix it in. I've heard the dried fruit gets too hard if you cook it in the oven)
2-3 tablespoons grade-b maple syrup or raw honey (or a combo of both) (I used local Sourwood honey)
2 tbsp virgin coconut oil or other healthy cooking oil
½ tsp vanilla extract or almond extract
1 large pinch fine sea salt
I added a Tbsp of chia seeds


Mix!


I lined a cookie sheet with aluminum foil. I need to get some parchment paper! Spread it all out. She instructs to bake at 300 degrees for 10 minutes.


Add fruit after it comes out of the oven


I stored mine in a mason jar in the fridge because it's just too darn cute not to see all the goodness inside. It has endless uses! Eat it by itself, with yogurt, with almond/coconut milk, with berries and bananas, blended in your smoothies, make an apple crumble...feed some to your dog...feed the ducks...ok. not those last too...


Jun 3, 2014

Something Tasty {Trader Joe's Brownies}

I am so happy with Trader Joe's Guilt Free Brownie Mix that I had to share how much I loved it! Our little town finally got a Trader Joe's not long ago. I went one day just to poke around but I finally went back to shop because I knew they had a great mission statement. On their website and their wall in the store: 

Trader Joe's private label products promise great quality fare for exceptional, everyday prices. We taste everything before we put our name on it and offer only what we feel is extraordinary. We tried it. We like it. If you don't, bring it back for a refund or exchange — no hassles.
When you see our name on a label, you can be assured that the product contains:
  • √ NO artificial flavors or preservatives
  • √ NO synthetic colors
  • √ NO MSG
  • √ NO genetically modified ingredients
  • √ NO partially hydrogenated oils (artificial trans-fats)
  • √ NO "marketing" costs
  • √ YES tasting panel approval
  • √ YES quality ingredients
  • √ YES great price
YES!!! I love all of that. So much more budget friendly than some of the other health food stores here! I'm not a TJ affialiate or anything - not getting paid for this. I'm just over the moon for their products! Including this one


You just need the mix and nf vanilla yogurt


takes a lot of arm power to mix but don't give up!


you have to spoon the batter in and move it around with the spoon and your fingers to get an even layer


They were delicious!!! Oh my goodness.


So yum.


Feb 14, 2014

Happy Valentine's Day {Chocolate Edition}

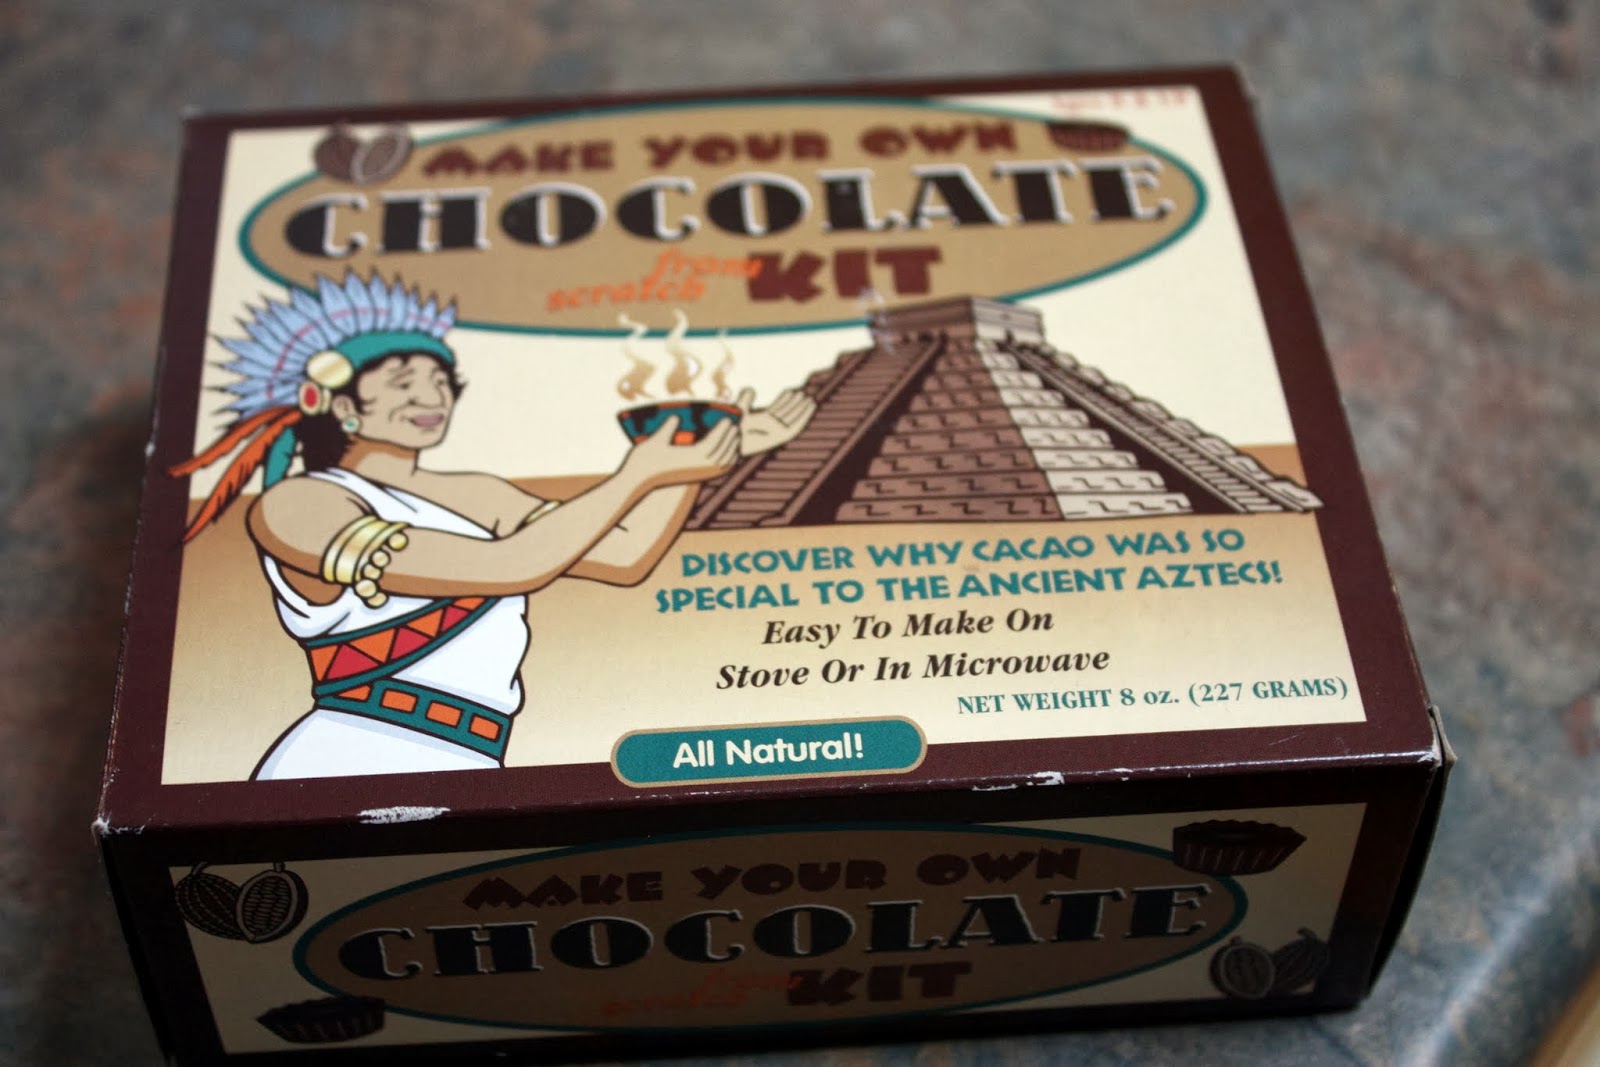
We've been a wee bit snowed in for the last two days. I was searching in the cabinets for something fun to make and ran across this Make Your Own Chocolate Kit that my son got for Christmas. I thought I would give it a try because, let's face it, who wants to be snowed in without chocolate am I right? Then the little light bulb went off and I thought: perfect Valentine's Day gift for my hubby too. Double win.

Here is the kit we had. You can get it on Amazon for $10.99 plus shipping. It makes about 20 pieces.  The package says 8 oz. The fun part? You can add anything to the dark chocolate. Like raisins, marshmallows, peanut butter (my fave), peanuts, etc.


The contents are organic Costa Rican cocoa butter, cocoa powder, confectioner's sugar, starter crystals, a temperature indicator, paper candy liners, instructions, and the story of chocolate. They also give you some cacao beans to taste. This is easy to do with your little one to help them see where chocolate comes from and how it melts. They are also good taste testers!


The directions are super easy to follow. My motto for 2013 and forever is "don't make it hard on yourself". So I used the microwave method! It worked perfectly.


I melted the cocoa butter. This smells sooooo good. Keep melting it until it is all liquid.


Then I added the sugar and the cocoa and stirred until well combined. You could literally stop right here and eat the whole bowl. What? Did I say that?


They give you a stick on temperature indicator to put on the side of your bowl. The directions say it needs to be 94 degrees when you add the starter crystals (makes chocolate hard). I found this to be the least helpful. It never really worked for me so I just went by the consistency of the chocolate.


You're letting the chocolate cool down at this point so go ahead and get your paper liners ready with whatever you want to add or just leave them plain.


I added the starter crystals. See the little lumps?


I popped it back into the microwave for 10 seconds because as I was stirring I noticed they were not disappearing. I figured I had let the chocolate cool too long. This is where the temperature indicator kind of failed. But it wasn't a big deal. Here's what it looked like after the zap in the micro. Perfect.


Time to add to the paper liners.


Put them in the fridge for 15 minutes. When they come out they will be hard. Here's a peanut butter one that I topped with some sea salt. This was my favorite combo. I know you can make your own chocolate at home without this kit but if you want to have a relatively easy and fast way to make fancy pants chocolate then this is it. No mess, no complicated recipe and your kids can help. 


This is what I gave my hubby with a little Valentine's Day card that I put together in the throws of the snow storm. I think he was pleasently surprised!